
How to Make a PowerPoint Presentation (Step-by-Step)
Learning how to make a PowerPoint presentation is easy when you take it one step at a time. PowerPoint helps you share ideas with pictures, words, and designs. Whether it’s for school, work, or a small project, this guide will help you create a clear and beautiful presentation.
What Is a PowerPoint Presentation?
A PowerPoint presentation is a set of slides that help you explain your ideas. Each slide can have text, photos, or charts. You can use PowerPoint to teach, present at meetings, or even tell stories.
When you know how to make a PowerPoint presentation, you can share your message in a way people will understand and remember.
Step 1: Plan What You Want to Say
Before you open PowerPoint, think about what you want to talk about.
Here’s how to start:
- Write down your main points.
- Decide how many slides you need.
- Choose simple examples or pictures to help explain your ideas.
A little planning makes everything easier later. (Learn More on Microsoft Support)
Step 2: Open PowerPoint and Start a New File
Now, let’s open PowerPoint!
- Click on File > New.
- Pick a Blank Presentation or choose a ready-made design.
- On your first slide, type your title and your name.
Choosing a clean, bright design helps your audience focus on your message. See Beginner guide
Step 3: Add and Organize Your Slides
When you learn how to make a PowerPoint presentation, you’ll use many slides to tell your story.
- Click New Slide to add another one.
- Use bullet points instead of long sentences.
- Add pictures, charts, or icons that support your message.
- Keep one main idea per slide.
Try to make your slides look clean and simple. Remember — less is more!
Step 4: Make It Look Good
Good design helps people pay attention. Here’s how to make your slides stand out:
- Use big, clear fonts that are easy to read.
- Choose colors that match but still stand out.
- Add images that show your point instead of lots of words.
- Try transitions or animations, but keep them light and not too flashy.
When your slides look clean, people focus on you — not just the screen. More design tips
Step 5: Practice and Present with Confidence
Now that you know how to make a PowerPoint presentation, it’s time to practice.
- Go through your slides and fix any spelling or layout mistakes.
- Rehearse what you’ll say for each slide.
- Speak slowly and clearly when presenting.
- Smile and make eye contact with your audience.
Practice makes perfect — the more you rehearse, the more confident you’ll feel.
Final Thoughts
Making a PowerPoint presentation doesn’t have to be hard.
When you plan, design simply, and practice, your slides can shine. Anyone — even beginners — can make a great presentation with these steps.
Now that you know how to make a PowerPoint presentation, open PowerPoint and start creating your next masterpiece!
How to Make a PowerPoint Presentation (Step-by-Step) , Create Power Point In Seconds
This guide will help you create a presentation using Microsoft PowerPoint, but it also works for tools like Google Slides or Canva.

1. Open PowerPoint
-
On Windows, click the Start menu and search for PowerPoint.
-
On Mac, use Spotlight Search and type PowerPoint.
2. Choose a Template or a Blank Presentation
When PowerPoint opens:
-
You can select a ready-made design.
-
Or you can start with a blank presentation to build from scratch.
3. Add a Title Slide
You’ll see a slide with boxes for your title and subtitle.
-
Click inside the box and type your presentation’s name.
-
In the subtitle box, type your name, the date, or any extra detail.
4. Insert More Slides
To add a new slide:
-
Click “New Slide” at the top.
-
You can also press Ctrl + M (Windows) or Cmd + M (Mac).
Each new slide can use a different layout (e.g., title and content, two columns, etc.).
5. Add Your Content
On each slide, you can add:
-
Text: Click and start typing.
-
Pictures: Click Insert → Pictures, then choose a file.
-
Videos: Go to Insert → Video, then upload or paste a link.
-
Charts and Tables: Use Insert → Chart or Insert → Table if needed.
-
Shapes or Icons: These can be added under the Insert tab.
6. Add Transitions (Optional)
To create smooth movement between slides:
-
Select a slide.
-
Click on the Transitions tab.
-
Pick an effect like Fade, Push, or Wipe.
You can apply a different transition to each slide or the same one to all.
7. Add Animations (Optional)
To make text or images appear in a fun way:
-
Click the item you want to animate.
-
Go to the Animations tab.
-
Choose a style like Appear, Fly In, or Zoom.
Use animations sparingly so your presentation stays clear.
8. Reorder and Review Slides
-
On the left side, drag slides to change the order.
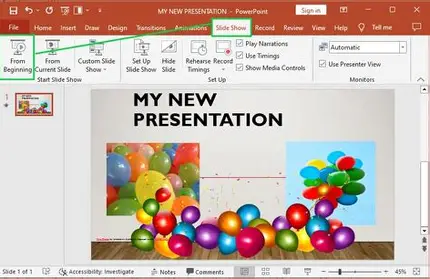
-
Click Slide Show → From Beginning or press F5 to preview the presentation.
9. Save Your Work
-
Click File → Save As.
-
Choose a location and give the file a name.
10. Present Your Slideshow
When you’re ready:
-
Go to Slide Show → From Beginning.
-
Use your keyboard arrows or mouse to move through the slides.


: A Simple Guide for Everyone")


, How To Use It?")


cyaze ninez uradutunguye
uratwika
bimeznez kabix
ni nez kb x
komereza ho
ENJOY MY DEVELOPER
VERY NICE
GOD BLESS YOU
BONNE NUIT
ENJOY MY DEVELOPER
VERY NICE
GOD BLESS YOU
BONNE NUIT
IMANA igufashe ikuzamure uzatwibuke dore tugi kujya hanze kd udusabire ku MANA TUZAHANYURANE UMUCYO tuzatsinde neza national exam
nibyiza ka bix
ufite ibitekerezo byiza ka bix